Tuesday, May 12, 2015

Walking Pads

What Is A "Walking Pad" 

and 

Why Do I Need Them?


Our roof is not homogeneous.  We are blessed with a small deck, a cluteratti of 21 PV solar  panels and "zero to a few" feet of snow every winter.


The logic of walking pads works this way. 
  • In order to maximize your PV solar generation (= MicroFIT revenue$) you need to keep the solar panels clear of all impediments like leaves, pollen and snow / ice. 
  • To keep the panels clean, you need good safe access so your can sweep the snow away, or pollen as the season dictates..  

How often?  It varies with snow fall.  Last winter (2014-2015) was 16 sweeping events.  The prior winter it was swept 14 times.  It is my experience that the sun will melt about 2 mm (1/8 inch) of snow fairly easily and quickly, but if you have more than that depth and you need to sweep, or you'll miss out on a days solar production. I don't sweep frosts, but will sweep pretty much any and all snow falls. [ I don't worry about clear ice, especially if it's thin. Does not seem to inhibit PV production. I daresay, its all about direct sunlight.]

  • You can't walk on sedums, and certainly not repetitiously. This is a big concern for the living roof.
Even if there is a thick mantle of snow insulating the sedums.

Therefore, I have created a demon called a "walking panel' to provide me with a safe, sturdy place upon which I can walk, and sweep snow, while not damaging our precious sedums.


A walking panel is basically a box 12" (0.3m) wide by 3-4 feet (0.8 - 1.2m) long, about 7"  high (17.5cm) (edge railing height, by definition), with a  durable top - concrete wall cladding in our case. 

My initial thought was to make plywood boxes.  But, at $70 per sheet for good, water protected Crezon wood, the cost would have been prohibitive. Especially as I have a building site next door with a small forest of scrap timber that is also PT (pressure treated) and where "the price was right". I also wanted a more durable topping surface than plywood would provide.

In the end, my walking pads were framed with (mostly) scrap PT wood, capped with crezon panels that were left over from another project (the "Shrubs In Tubs" blog entry) and topped with offcuts of the same concrete panels that were used for the rain shield for the house.


Last winter I kept track (poor pun) of where I walked every time I swept the solar panels.


As the winter progressed I refined this pathway to its minimum, while still providing sufficient coverage for a clean sweep.  

That drawing provided the locations for the walking pads.

Sunday, May 10, 2015

The Greening of the Kitchen Roof, Finally

Kitchen Roof Topping Off

After about a year of eager anticipation, the big day had arrived when I could finally, put the living / green layer onto the kitchen roof.  

Rain, a couple of days prior, had wetted down the water storage layers so I did not feel the need to wet them especially.  

The first layer to go on today is the "growing medium". It will provide basis for rooting by the sedums, eventually, plus a modest amount of water storage.  In reality, it will keep the sun a further inch away from our kitchen, to reduce our summer cooling loads.

"Growing Medium"  a mineral based manufactured material, never to be confused with soil / triple mix and the usual bunch of horticultural soils.  The difference is that growing medium is predominantly mineral or aggregate based with only a small portion of organics. It does not break down as easily as soil, which has a much higher organic proportion.  If you were to use "soil" on your roof, then it would eventually breakdown, lose its structure and flow away like mud. Ans soil can get very heavy when its is wet : it can have a very high "field capacity".

The downside of using growing medium is that it does not easily provide nutrients to the plants. so we will need to add these regularly, in perpetuity.

In our installation we used XeroTERR growing medium from the XERO Flor company.  

"XeroTerr" is described officially as a  "Lightweight aggregate growing medium mixed specifically for use within Xero Flor mats and green roof system build-ups. (It is) A proprietary mixture of lightweight, mineral based materials; including porous aggregate and organic matter derived from composted plant materials."  Our batch had a noticeable portion of crushed brick in it.

From the labels on the 1 yard totes, this material was manufactured locally in Ontario.   


A bucket of growing medium

The growing medium is spread in a layer: raked but not compacted.  On this roof the layer was about an inch thick (25mm).  That is as much as we could put onto the roof and stay within the structural strength limitations.


Two Minimats ready to be placed


I ended using a kneeling board just to prevent compaction of the growing medium. You basically lay down the Minimats and jam them against each other.


Shaping of mats to fit "geometry" is really easy, requiring only a sharp cutter, a board,  and some elbow grease. 

End of the first row, fitted to the outlet shape.


Repeat until finished.

I will add that the hardest part of the work was the lugging of the growing material around from the driveway (where it had been delivered in 1 yard sized totes) and up the ladder.

There was very little wastage or "left over" sedum minmat. One spare piece would usually be sufficient if your area calculations are good. We had both our "spare" and two half mats declared surplus to requirements. They will be used somewhere else round the garden.

I did water it quite well on the first day - until the water ran from the gutter.  Overnight the sedums "perked up" noticeably an soon poked a good inch above the railing.  A couple of warm days also helped their recovery.


This is the view from my office at the end of installation.  The sedums are a bit squished, but will (did) recover very well after a good watering and a couple of warm days.

Later Comment : We are noticing a gradual change in the look over time.  The sunny parts of the roof are becoming quite a bit redder and the taller species are beginning to poke through.   I'll post some progress pictures later on.

====================================================================

Xeroflor Canada Inc. is located at  One Yonge St., Ste 1801, Toronto, ON, Canada, M5E 1W7

Tel: 416.637.5772


General Mailbox : info@xeroflorcanada.ca


Saturday, May 9, 2015

Minimats for the Kitchen Roof

Sedum Master  - Sedum Minimats®


Throughout the design process (across the winter of 2013-2014) there was a constant battle over weight. What can the roof hold vs what would we like put onto it.  How heavy are the sedum panels when wet (at field capacity)?  How much growing medium?  

Very early on, I gave up on the idea of using sedum plugs and "planting" them into growing medium, and waiting a season or two for coverage. I elected for an instant roof with 100% coverage provided by mats / tiles.

In the end, we opted for Minimats on top of one inch (25mm) of growing medium, on top of two water storage layers, drainage layer, etc

One of the considerations about the kitchen roof was that I look at it every day, and I had my heart fixed on a "look" that was a mixture of red and green, even early in the summer - to complement the variety of greens available from the ravine backdrop.  

Having Googled every sedum mat vendor from Windsor to the Gaspe, I had converged on a particular light weight Sedum Master product that I could install by myself via a ladder. 

However, this product was taken from the market in 2014 for a variety of commercial licensing reasons.  They did replace it with a delightful "Minimat" product that I was assured would be green with plenty of red.  

The Minimats are 1' by 2' (0.3 by 0.6m) in size and weigh about a pound, dry.  You can carry three of them up a ladder single handedly. They weigh about 0.1 KPa, saturated, compared with 0.3 KPa and up for other sedum mat products.


The product is grown in a tube house, and you need to watch your hardening for early (April) purchases.  Late winter frosts can go a long way to hurting an early spring installation.  

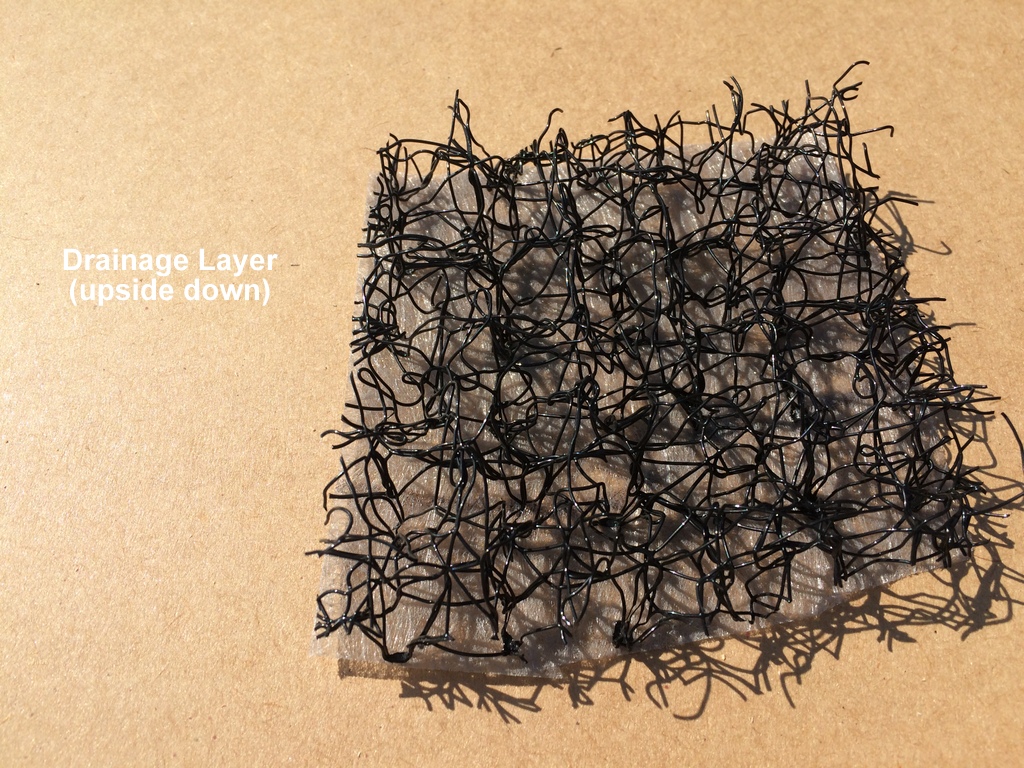
The Minimats appear to be based on an open weave plastic matrix material, not unlike the "drainage layer" material, turned upside down so the geo-textile is on the bottom.  The "growing medium" appears to be a peat moss and perlite - very light weight even when wet. The assembly is about 5 cm (2") high / thick when you but it.  

The species mix is mostly broad-leaved and big fat succulent leaves. So far I have been able to identify several species of Sedum Spirium, and Allbum, plus Cherry Tart and Lime Zinger - about 8-10 different ones.


I rented a van and drove to Princeton to pick up my 54 pieces - not an unpleasant trip from Toronto.  

The price was about $6 per square foot in 2014, in small roof quantities of about 100 sq ft. (10 sq m)


Here are all my mats stacked on the deck ready for installation.  
They can stack 5-6 high without obvious damage.


==================================================================
Sedum Master, can be found 746645 Township Rd. #4, Princeton, ON N0J 1V0,  Phone: 1-888-458-4061, Fax: 519-458-8883.  
www.sedummaster.com
Princeton is a rural community south west of Cambridge, ON.

Friday, May 8, 2015

Shrubs In Tubs - Part 3 -Insulated Planters

Shrubs In Tubs - Part 3 - Insulated Planters


We decided to plant some junipers up in the trough. Rather than using tubs I built a couple of insualted planters that had legs to hold them up near the top of the parapet,  

These planters are about 12" wide , 13" deep, and 30" long (0.3m by 0.33m by 0.76m).  They hold the same amount of growing medium (same design weight) as the tubs but in a form more supportive for junipers.

They are constructed from 0.5" (12mm) Crezon around a skeleton of 2" by 2" wood. The 2" timber matches the 1.5" EPS perfectly. More like five mini SIP panels than a complete skeleton. 

There is no right or wrong way to do this.  Here are some photos to show how I did it.  The legs are actually the outer pieces of the ends of the planter.  They are about 24" tall to match the height of the parapet.   The 2" timber basically provides something solid to which the crezon panels can be attached/ screwed.

The coaming is also Crezon, about 1" bigger than necessary,  to create a drainage lip on its outer perimeter.

Drainage is provided by a 1.5" dia PVC pipe drilled through and well caulked into the base.  The inlet to the drain is a plastic grommet of the type normally used for neatly passing computer cable through a desk top. Well caulked.

All the seams are well caulked with a silicon sealant.  Didn't worry about the lack of paintability because the joints are out of sight when viewed from ground level.

Four coats of good exterior paint.

Shows the end panel / leg
Insulated skeleton or mini SIPs ???


Corner insulation details

Interior corner.  Base is 4" by 2" timber, set flat.

With interior panels screwed in, caulked and excessively painted.
All ready for hoisting and filling.

Thursday, May 7, 2015

Shrubs In Tubs - Part 2 - The Tubs

Shrubs In Tubs - Part 2 - Building The Tubs


When we realized that we could NOT fill the trough with growing medium (too heavy) then the idea of "Shrubs in Tubs" came into focus. 

The big issues relate to insulation of the root ball and the isolation of the plant from sun / shade heat/ cold cycles, be they diurnal or seasonal.

We developed two tubs.  One was based on traditional circular landscapers tubs.  The second was a rectangular planter, on legs.

The circular tub consists of a 20 gallon tub set inside an 25 gallon tub, with the intervening space filled with insulation.  

A circular disk of insulation goes on the bottom.

The walls are insulated with rectangular pieces of 1.5" EPS rigid expanded polystyrene (cut from a sheet). The staves of EPS were about 2" wide and 18" long.  They sit in between the tubs like barrel staves.  The space in between the rigid EPS was then  foamed with a regular can of insulating foam sealant - $12 at Home Depot. It took about two cans of foam per tub set.  Had I spent more time customizing my barrel staves of EPS I might have saved a couple of $$ on canned foam.

 Here is a  pictures to save me a thousand words.


20 gal tub foamed inside a 25 gal tub

The only caveats are that sometimes the expanding foam can push the inner tub out of the outer tub.  So stand inside it as you foam, and while the foam sets a bit (stops expanding). Secondly, foam should extrude out of all holes in the tubs.  These need to be trimmed and caulked.

Drainage.  You need to provide some drainage. I drilled two holes out horizontally at the base of the inner tub and inserted 1.5" PVC pipe about 6 in long. The diameter is not crucial - its just what I found lying around the neighbouring building site.  Just provide a reliable conduit.  Then caulk it into place both inside and out.  Another picture.


This one not only shows the drains but also the caulking of various holes in the original tub.


Coaming.  You need to provide some form of coaming around the top of your assembly to keep the rain off the insulation.  Trim all the surplus foam and tub handle off.  The coaming itself is an expandable down spout extension, cut half longitudinally.  You drap it around the top of your tubs concave side down, and with a good overlap.  Then having drilled holes at 2" spacing around the top of the tubs (through both tubs and the intermediate foam, you use a palstic tie (or a pair of them) wrap to tie the wrap down onto the top of the tubs.


Here is the finished version with the coaming cinched down into place.


In the end I made five tubs in tubs.
These are now ready for hoisting up to the trough and filling. 


Wednesday, May 6, 2015

Shrubs in Tubs - Part 1 - Load Panels

Shrubs in Tubs - Part 1 - Load Panels


The garage in our home extends beyond the edge of the house by about 5 ft (1.3m) in two dimensions, both south and west.  The builders built a parapet around this extension that is 24 in (.6m) high. The southerly trough is sunny and quite exposed. The westerly trough is "part sun" and is more sheltered from winds as it lies between us and the neighbouring home.


From the structural analysis we quickly learned that we could not fill the trough with growing medium otherwise that corner of the house would collapse. 

There was no real point putting sedums here especially when we had an opportunity to do something a little more creative and dramatic.  Like "shrubs in tubs".

However, the roof joists would not easily carry the concentrated loads from a tub (20" dia, 0.5m). So we ended up with a fleet of load distribution panels to spread the load across as many joists as possible. The loading maths works out with one shrub in a tub per panel, on average.

Each panel consisted of two sheets of 3/4" crezon plywood, glued and screwed and painted. 

Crezon is the commercial name for an exterior grade plywood, specially treated and prepared for the sign industry.. It is also described as MDO - Medium Density Outdoor -Plywood


MDO Plywood - The Paintable General Purpose Plywood Panel


 An EXTERIOR type plywood with a weather-resistant resin overlay bonded to the wood by heat and pressure. This process fuses the molecules of the overlay with the fibres of the wood to form a bond as strong as the wood itself. MDO has all the advantages of regular plywood as well as additional properties. The overlay, which has 28% resin content, resists water, weather, wear and degradation. It has texture that paint can grip with remarkable tenacity. Paint finishes on MDO are up to three times more durable than the same finish applied to ordinary plywood.
Crezon is not cheap ($70 for 4' by 8' by 3/4" sheet) but it is the right material for the purpose.
The load distribution panels were sized to give about 2" (50mm) clearance against the parapet and house walls.  They are all about 40" (1m) square in the south trough, and 48" (1.2m) square in the slightly wider west trough.
They are glued together and screwed. They are also painted with 4 coats of a premium outdoor latex paint. I don't plan to replace them in my tenure here!.


This next picture shows how they are laid out within the troughs.

West Trough

Within the troughs, the load distribution panels will be underlain by many (6) layers of the drainage layer material.  It is about 3/4" thick (12mm) (per layer) and is very springy.  The springiness helps with the even distribution of the load across the bearing surface, as well as providing superb drainage.

[[ These panels were actually hoisted into place after the main roof was completed.This drainage material was left over from the construction of the main rood living roof.  You have to buy whole rolls of it, When you use 1/10 of a roll for the original purpose, you then can get creative with the 9/10.]]


 The lasting benefit is that, while the panels themselves likely get hot in the sunshine, they actually shade the underlying roof membrane, with very little conduction via the drainage material.  Our garage is noticeably cooler this summer than last.  It still gets warm, but not to prior years blast furnace levels.

As it turns out we used almost all of the the scrap Crezon in the construction of the walking pads for the main roof.  Crezon is ideally suited to the damp  job at that location.  

Recover, reuse. Pity we couldn't get any more LEED points for it!

Friday, May 1, 2015

Flood Test is Passed!

Too Much Goop ? No Way!!!

I have come to the conclusion that you can never have too much caulking.

Following yet another contractor visit that didn't really fix the problem I discovered that the scuppers are actually constructed from two layers of sheet aluminium.  

The hole cut on the top / lid of the scupper went through two layers of sheet, creating a marvelous opportunity for a leak when pressurized in a flood circumstance. This orifice was not caulked. It could only be seen from below when looking "back up" the scupper.  Pain in the neck, literally.

Half a tube later its all fixed. 

"Trem Seal S" is a silicon based sealant, very sticky for the first couple of days.

Ever onward!