Tuesday, June 23, 2015

Shrubs In Tubs - Part 4 - Installation and Planting

Shrubs In Tubs - Part 4 - Installation and Planting


The planting of the shrubs is a bit tricky because I did not have access to a mechanical hoist.  

Friend Lino, the framer for the houses behind ours, did give us a lift with the Load Distribution Pads, and the two planters, but he was away on the day when I finished the installation.  Lino has a zoom boom and is very gracious when we needed a hoisting hand.

The installation of the shrubs into the tubs was fundamentally the same as on the roofs.

Two layers of drainage material were fitted to the base.


It was then covered with  a layer or two of the felted water storage material, cut to suit the geometry of the tub or the planter.


The tailoring of the storage layer to accommodate the circular geometry of the tubs means that there is quite a large area of overlapping material.  More storage capacity.


The containers were then filled "3/4" with the same mineralized growing medium as was used on the roofs. It is known as XTerr from Xeroflor.

The last 1/4 was a mixture of growing medium and "triple-mix", mainly because I had he triple-mix available (left over from last season) and I wanted to add more basic nutrients to the immediate growing zone.

Plantings.

There were chosen for their tolerance of full sun, a bit of heat, and modest water.

The two planters received a juniper each.  It is hoped that these will grow up a bit, but mostly sideways. The tag said 1.5'  (0.5m) high and about 3' (1m) wide.

The following material was planted into tubs.
  • Pom-Pom Pine Pinus sylvestris '(pom pom)' - ours has only one pom so it is not really a pom pom.
  • Cascading White Pine - pinus strobus that may have been trained in its youth
  • Two Tree PeoniesPaeonia suffruticosa   are about a foot high now, but we have higher hopes.
  • Climbing Hydrangea - I have added a trellis of bamboos to provide a some height to which it can aspire.

Irrigation. 
I have added a complete drip irrigation system, accessible from ground level. It is a Rain Bird Gardener's Drip Kit from Canadian Tire, about $60 (2015). I added a few drippers and a second circuit to support the climbing hydrangea with RainBird pieces from "Lowes".  Lowes has a good selection of individual drip irrigation components so you don't have to buy complete kits each time you want another pressure reduction valve.

The climbing hydrangea has multiple drippers because it needs more water than the others. As a rule they all get watered on the same frequency as the rest of our garden. 


West Trough


South Trough

South Trough


South Trough
South Trough


Thursday, June 11, 2015

City Incentive

The City of Toronto Eco-Roof Incentive Program


You might recall from an earlier session that we had applied for a grant under the City of .  

In summary, the City will give you a grant of $75 per square metre to install a living / green roof on your own home.  
  • You will need to make an application in advance to join the program (quick).  
  • You will need to get a City Building Permit (possibly slow and time consuming).  
  • Do the installation ( you control this part)
  • Have it inspected twice - once for the Building Inspector for their sign-off of the Building Permit and again by the staff of the Eco-Roof Incentive Program. ( a couple weeks)
We had a very pleasant visit with them about a week after the installation was the finished.  The sedums had been watered, and rained on, and had recovered nicely from the ordeals of travel. 

There was lots of discussion as we were the only full blown full coverage residential building "in play" at the time.  They even brought out the Summer Intern as part of their on-the-job training program.  There was a form to be filed out, photographs taken "for the record"  and measurements confirmed, to be signed-off by the City  staff.

Six weeks later the cheque arrived in the mail.

I commend this Eco-Roof Incentive Program to everyone in Toronto.  It works simply and well. In our installation the City "incentive"  covered about 1/3 of our material and permitting costs.  

All things considered, our roof costed about $200 per square meter for all the things I had to spend money on.Material, delivery, hoisting, permits and approvals, 3rd party technical support.

To which you add "labour".  Realistically, commercial labour could double your cost for a simple installation, or trble it for a fussy installation.

Tuesday, June 2, 2015

Sedums for the Main roof

Sedums on the Main Roof


The next two days were the culmination of almost 14 months of dreaming and scheming , hatching and planning, designing and organising and grunting.  It seemed like a long flog but we were looking forward to its end.  

The sedums for the main roof arrived on a big truck with a extendable boom like a HIAB crane.  It could reach up about 40 feet and could swivel its forks around.

I need to apologize for a complete lack of pictures here as my brain faded completely. Si you'll the thousand word version.

The product we installed from Xeroflr was their XF301 Sedum mat.  It is a field grown product.  It was delivered on a Connons truck so I assume it was grown by Connons on one of their Waterdown farms.

It was based on a layer of drainage material weave side up that had one layer of water storage fleece below it.  The open weave of the drainage material was filled with GM (growing medium) into which a range sedums had been grown.  By my count we have 8-10 species, although a couple predoominate.

The mats came rolled in 1 m by 1 m sections. Each roll was 1 m long by about 0.4 m in diameter, weighing about a gazillion pounds. About 40 or 50 lb.  Quite heavy and unweildy. They were delivered with 54 sq m ( about 550 sq ft) rolled up on two pallets.

Aknwloedging the reach of the crane, we elecete to lift them in batches of 6 -7 beacuse that matched the distribution of our temporary staging zone / landing pads.

S, with teh drivers help we rebundled the rolls intoa spare pallet and starting hoisting them up toteh roof. Whih took a couple of hours.

Then, with the trusty support from my able assistant (son, 28) we unrooled the mats and fitted them on top og the GM.  This brought t top of the installation up to be about 1/2 in above the level of the perimtere rail. Which felt fine to me.  

There was quite a bit of cutting and fitting to manage the smaller areas and shapes.  Initially I used a pair of scissors, for about 2 inches.  Then I tried a heavy duty Excato style knife and used a fresh blade every meter.  The GM is very bluntening. I would run out of blades very quickly. 


The solution is a 4" size angle grinder hired for the day or two.  


It was fitted with a "crack chaser" blade.  Did a really good job of cutting through the felted base material and the woven GM carrier.  Worth at least $40 a day!!!

To their credit, Xeroflor did ship a few more pieces than were strictly ordered, so we were able to sift and pick through the shipment to get really good mats for installation.

The sedums did come out looking floppy - flat and jaded - not unexpected from rolled material that had been scrunched into a roll then bounced at the way to the installation site. As part of the installation process I gave them all a good watering and they picked up substantially over the next couple of days.

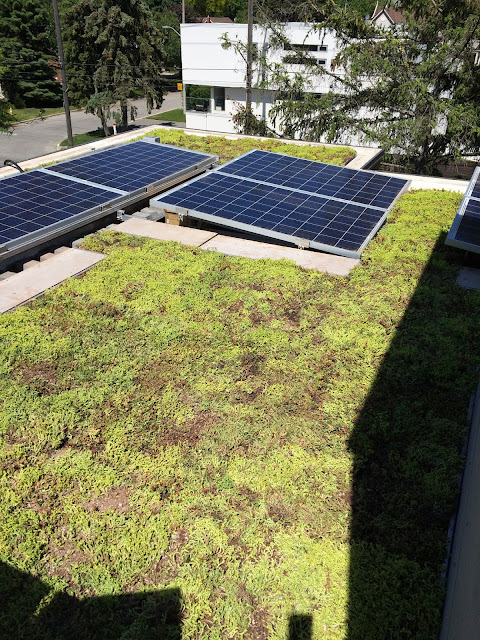
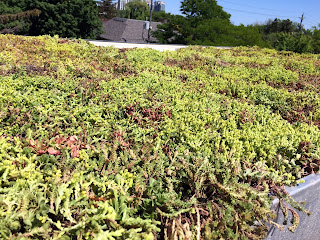
So here is how it looked after we finished the installation.


Main roof open area

Up on the top of the 3rd Storey Walkout - close up.

Up on the top of the 3rd Storey Walkout.

The northern edge is tucked underneath the solar panels.


In some locations the GM filtered through the sedums.


Well, that's it. Jobs over. 

Over the next few months I'll put up some photos to show how it develops.  I'm hoping that the areas with GM showing will diminish as the sedums really start growing.

And I am looking forward to a cool summer.

For people who are interested in further discussions I suggest you leave a comment and I'll get back to you. We can remove the comment later to keep your coordinates relatively quiet. Or contact me via Facebook.
.